Cock-Clausen, Ingeborg. Moden 1890-1920. Copenhagen, 1994.
Hunnisett, Jean. Period Costume for Stage and Screen: Patterns for Women's Dress, 1800-1909.
Tuesday, April 27, 2004
So of course the rational schedule I made in my last post was completely overambitious, and I was up until 2am the evening before the event sewing...
Finishing the skirts took longer than expected because of needing to thread mark all of the pleat lines in the center front overskirt panel. I tried using marking paper and a tracing wheel, but when I ironed the pleats it steamed the mark right off, and I really wanted the pleats to be as close to perfectly straight as possible. Nothing worse than a major design element being wonky!
I did end up using organza in the overskirt hem panel, which definitely helped give a bit more (but not too much) body to that section. Had another fun moment when I went to attach the hem panel -- I'd carefully measured everything when I drafted the skirt pieces, and the hem panel was supposed to fit with the main skirt pieces into an exact square. Well, of COURSE the side skirt seams were too long, so I had to futz when matching the seams, which pulled up the hem panel a bit at the CF (something I can live with).
The final detail was some pretty detailed brown buttons from Britex -- I wanted some contrast, so I went with a brown that matched the hat ribbon. The buttons turned out to be slightly larger than I had pictured, so I went with three on the bodice front and four on the overskirt hem.
I really really wanted a HUGE Titantic hat for this outfit, but ran out of time to even think about making one and couldn't find one anywhere for sale. I finally found one possibility at Macy's -- somewhat wedding hat-y, but it worked. I took off the straw bow, which I replaced with some fabulous ribbon from Britex. I didn't want the outfit to be too matchy, so I went with a chocolate brown satin ribbon topped with an ivory satin ribbon with a subtle stripe (had to work some stripes into there somewhere!). I also planned to cover the whole thing with white and wine colored flowers (to match the dress), but completely ran out of time -- at the last minute I found a vintage flower pin in my jewelry box and stuck that on top. Here's before & after pics:
The shoes are a great story -- my mother bought them for me about 12-13 YEARS ago. They were never the kind of thing I'd wear for everyday, but I always knew that someday I'd make a 1910s outfit and they would be perfect. They lived in closets, in my mother's basement, in all sorts of weird locations, and finally found their use!
So after a bit too little sleep, I was off to Fremont to the Shinn House and the GBACG Gibson Girls picnic! The event was fabulous, everyone looked great, the weather was gorgeous, and the house and grounds were just beautiful. You can see lots more pictures on the Gibson Girls photos page.
The next time I think I can actually organize something at 3am on a Sunday night/Monday morning, stop me, okay?
I really wanted to get the skirt pieces cut out on Sunday night before I went to bed so that I could put away my sewing table and be ready to go for weeknight sewing. Since the main skirt pieces for the overskirt and underskirt are relatively similar, I thought I'd be brilliant and put each skirts' pieces in a separate pile.
Well, last night I sat down to put the underskirt together, and when I did, it was suddenly Really Really Tiny. I squinted, I compared the pattern pieces with the mockup, and I had absolutely no idea how I could have suddenly made the front pieces so much smaller. After hauling out all the pattern pieces and comparing everything, I finally realized -- I had sewn together the overskirt pieces, and had sewn together the two side fronts as though they were the entire front. Whew! This was a VERY close call as I am completely out of fabric.
No more 3am organization for me, no siree. And I swear to double check EVERYTHING from now on (she says after having had to rip out many a seam last night because of sewing wrong sides to right sides).
So the plan is to finish assembling the skirt pieces, including marking and putting in the CF pleats, hem, and attaching the skirt to the bodice tonight (Weds.). Then I have Thursday and Friday to put in all the fastenings and finish the hat (and repair a shoe) -- but more on accessories later.
Opinions needed: should I interline the overskirt hem panel with organza for added stiffness? I'm already planning to use two layers of the wool crepe on that piece, so maybe that'll be enough weight? I'm thinking that organza would help to round out the hem... what do you think?
This weekend has been marathon sewing weekend, and I'm completely exhausted.
First up was the sleeves. I knew I wanted to change them from the above-the-elbow length in the original to something 3/4 or full length. I looked through a bunch of patterns and illustrations and found that the pattern for the 1908 afternoon dress in Janet Arnold came the closest to matching the line of my dress. I started by drafting up that pattern, which I adapted into this guy, which is basically an only slightly full sleeve with 3 horizontal tucks near the hem. Under this I made a shorter than 3/4 length white cotton undersleeve, to which I sewed a cuff made of the ivory point d'esprit (tucked to match the collar) over the ivory china silk. I spent from about 6pm until about 3am Friday night just cutting out and assembling these puppies -- I can't BELIEVE how much time it took.
Then Saturday was marathon skirt pattern drafting day. I always have a hard time with pattern drafting because my mind is terrible at A) math and B) geometry, and skirts are the most annoying because they're so big. I basically stuck with the original pattern though, so that helped. The underskirt is basically relatively straight down to the seam about 3/4 of the way down, after which it has an angled piece in the back to allow for walking. The overskirt is the same shape as the underskirt -- in the mockup I have here I don't have the hem panel and I didn't do the pleats in the CF, as I was just checking for size and style.
Please ignore all frazzledness in these pictures...
More on the hat later -- it's not done and I'm too tired to write more!/p>
posted by démodé 4/19/2004 12:09:53 AM
Monday, April 12, 2004
I'm getting a little bit freaked out over just how long this project is taking. I'm still working on the bodice and I have less than two weeks until the event! I keep telling myself that this is the hardest part, but I'm still getting nervous.
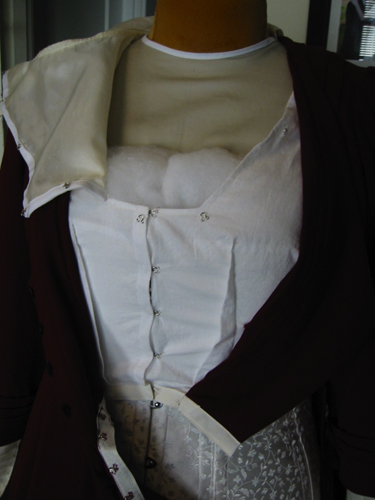
I spent most of the weekend working on finishing the lining, which doesn't SEEM like it would take too long but took FOREVER! First I had to draw in the line indicating which part of the lining was visible, then redraw the lining pattern so that the visible portion would be replaced with net. That took futzing, then more futzing for cutting out and assembling (including recutting the lining front so that I had a CF opening). I had planned to use an ivory point d'esprit for the visible portion, but hadn't really thought about the fact that that's a very sheer fabric and if I just used that, there'd be a whole lot more cleavage going on than one probably wants at an afternoon event. Luckily I had some ivory china silk in my fabric stash, so I was able to use that as an underlining.
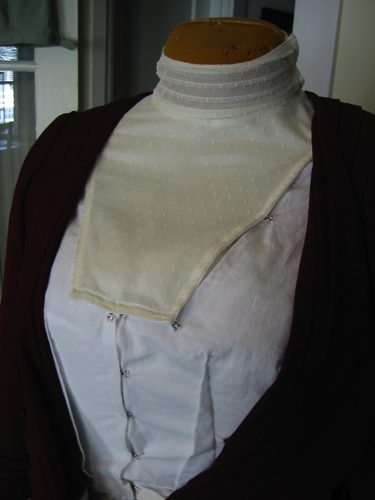
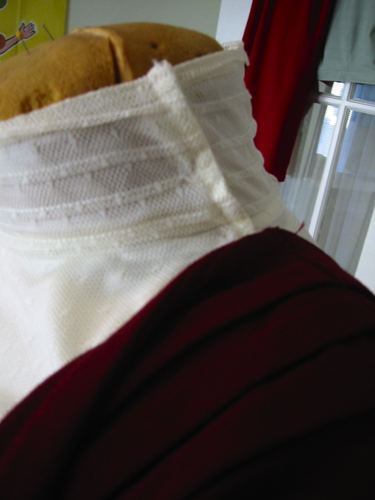
Then it was on to the collar... this was the first high collar I've made, so I wasn't entirely sure what I was doing. I basically measured how high I thought I wanted it to go and then looked at the 1900-09 collar patterns in Period Costume for Stage & Screen and just messed around until I got something I liked. I wanted tucks in the net as in the original, so I sewed in pintucks into the net before I cut out the collar. Luckily I went ahead and tucked the whole 60" width, because my first attempt at a collar ended up closing on the wrong side... (hitting head) so I had to recut and resew the whole thing. Crikey! Luckily the net is stiff enough that I don't need to use collar stays.
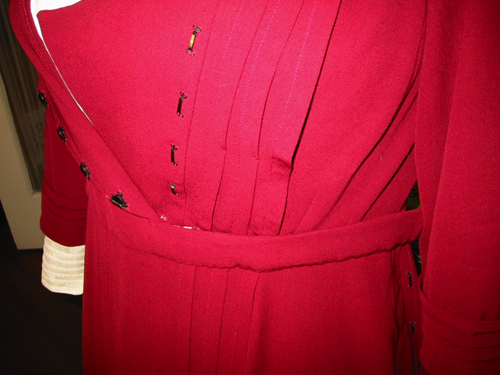
Once I'd finalized the lining I was able to pin on the overbodice. I'd basically ended up taking out almost all of the extra bodice ease, except for a small pleat on each side back... which meant that the blousing looked silly, so that's going too. Fitted silhouette = my friend. I pinned the heck out of everything (pictured) and then sat on the couch and basted everything together (not pictured), as well as permanently stitching down the back neck edge and the shoulders, plus adding tacks to the front pleats where they were pulling open./p>
Next up: sleeves. I'm going to change them from being above-elbow to being full length (3/4 length in the wool, with net cuffs) because I don't want to wear long gloves. I'm not too sure what sort of design I'll be doing -- need to look through some books to get ideas.
Over the weekend I cut out, marked, and put together most of the bodice. Marking the pleats was irritating -- I used marking paper and a tracing wheel, but it was hard to fold the pleat correctly with the marking only on the inside of the bodice, and when I ironed the pleat the marking basically disappeared. So I ended up redoing the pleat markings with thread tracing. I could tell that the pleats were going to pull open annoyingly, so I did end up sewing them down -- each one .5" from the hem, so that it looks even from the outside.
I decided mid-way through putting this together that I want to change the way the bodice fastens. The original fastens CB with hooks and eyes, which is easier to do but less attractive to look at. After looking at the detailed drawings of the closures in this 1908 bodice from Nancy Bradfield's Costume in Detail, I decided to adapt this -- which means that the CF overlaps will become functional, with the bodice lining hooking CF and the net inset hooking down to the bodice lining. I'll probably go ahead and keep the buttons decorative, and either hook or snap the bodice overlap at CF closed.
I'm not entirely sure how I'll handle attaching the bodice to the waist belt -- I'm assuming I should sew the overlapping bodice piece side to the belt, leave the underlying bodice free and hook that in to the belt, and then close the skirt at the side (which is how I've usually seen it done) -- any advice on how to do this zig zag closure with an overlapping CF?
Next up will be the bodice inset (plus I need to recut the bodice lining front so that it meets edge to edge CF), then I'll sew down the bodice to the lining and move on to the sleeves.
This dress is for the upcoming Greater Bay Area Costumer's Guild's Gibson Girls event -- a tour of historic Shinn house, along with picnic and croquet. I've admired this dress ever since I first saw it, and I've recently gotten very excited about teens dresses (including the straight silhouette from 1909-14ish and the fuller styles of the later part of the decade). I love tailored styles, which is what appeals to me so much about this dress -- I love the pleats and the fact that the dress is really interesting without being froofy.
I (hallelujah!) have a scaled pattern for the dress, which came from a fabulous series of books on Danish fashion -- this one is from the 1890-1920 book (there are three; the other two cover 1790-1840 and 1840-1890). Unfortunately the pattern is in Danish, but I'm hoping to be able to muddle through based on the pattern shapes.
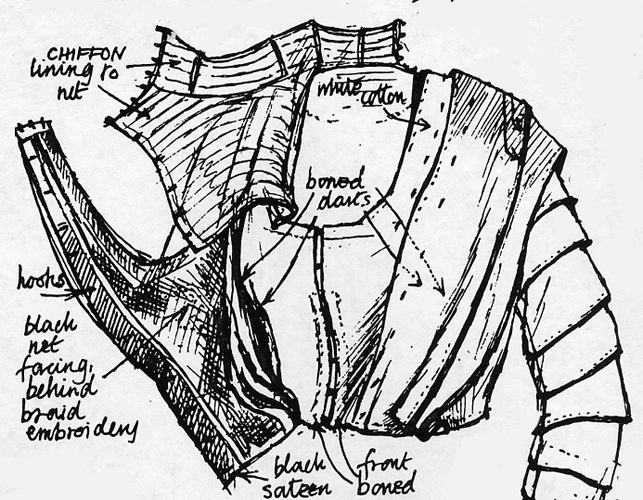
The dress is based on the typical post-1890 silhouette of a non-fitted bodice built on a fitted lining. I'll be wearing it over my recently completed 1910s corset, and probably some kind of petticoat -- but I'm not sure exactly what the shape the skirt will turn out to be, so I'm planning to make that after drafting up the underskirt. The dress will be made of a wine-y purple wool/rayon blend lightweight crepe, with ivory point d'esprit for the bodice inset and sleeves.
The bodice will be my first draping project (why start small?), made possible by a major overhaul of my Uniquely You dress form (including making a new cover and lots of creative padding). The lining was relatively easy to drape, once I made sure the dress form was accurate to my shape. I'm waiting to mark where the net inset will go until I have the overbodice finalized.
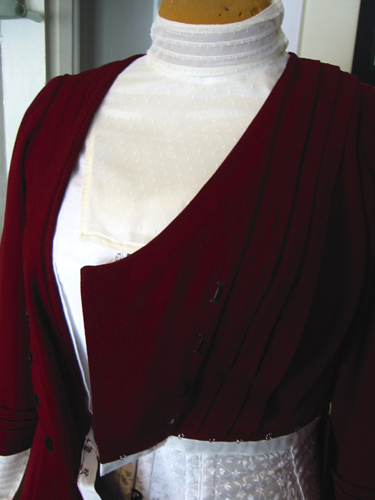
The overbodice was a bit more complicated. I started by looking at the scaled pattern, which shows that the bodice front has the edge of the pleated cut on the straight, with equidistant pleats. The bodice fullness is controlled by three knife pleats along the waist line in the area between the third pleat and the side. Now, I don't know if it's because the original wearer was much smaller busted than I am, but I just couldn't figure out a way to control the fullness through those knife pleats -- when I pleated the fabric, it pulled from the bust point at a sharp angle towards the side in a very unattractive way. So I futzed and I futzed and I finally curved the pleats in front over the bust point and then gathered the small amount of fullness left along the waist edge.
The center front overlap is a separate piece, sewn to the edge of the pleated part. The only change I made there was to make the overlap higher up -- I felt like it needed to be above my bust point.
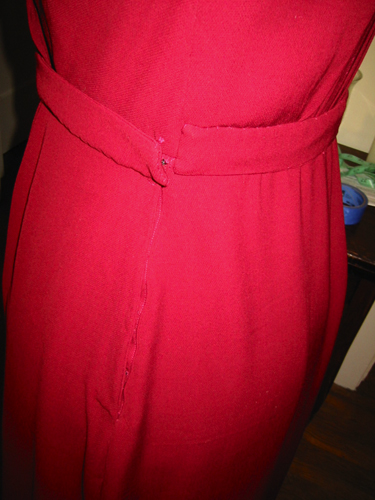
The back was much easier, as there's less topography to deal with there. The only change I made there was raising the V point at the CB so that it echoed the CF cross over (which is actually different from this photo -- the bottom of the V will be where the blue pen mark is on the CB seam).
Now here's where I need advice! This is a transitional period from the pouchy, low bodice front pigeon breasted Edwardian silhouette and the high-waisted teens silhouette. The mockup that I currently have in these photos is cut directly at the waistline -- that includes seam allowance, so it'll be 1/2" above my natural waist, plus there's a belt which I assume will be about 1.5". The question is, do I raise the waistline higher up? Part of me thinks yes, that will be more flattering because the skirt is fitted through the hips, so it will expand the amount of torso area that is fitted rather than pouchy. The other part of me says no, I'm already somewhat short waisted (somewhat corrected by the corset) so I shouldn't shorten any further. Here's a fuller photo of the bodice front so you can get an idea of the silhouette -- again, imagine this .5" higher but with a waistband that'll be anywhere between 1-2".
Any and all opinions cheerfully accepted! (Asked my husband and all he offered was "looks great, hon!" The cats were no help either.)
Oh, and what's your feeling -- sew the pleats in or only iron (and possibly tack them)? It looks like the original is only ironed/tacked, but I was already finding them wanting to pull open as I was draping.

)
)
)
)
)
)
)
)
)
)
)
)
)
)
)
)
)
)
)
)
)
)
)
)
)
)
)
)
)
)
)
)
)
)
)