) | ) | ) |
) | ) |
posted by démodé 7:41 PM

démodéadjective:old fashioned, out of style, unfashionable [from French, the past participle of démoder "to go out of fashion," from mode "fashion"].the concept
the fabric
the pattern
the result
what's on the dvd player?What else? Dangerous Liaisons useful linksTimeline of Costume History: Mid-18th Century Europe: 1730-1775 La Couturiere Parisienne: 1700s 18th Century New England Life: On Dressing the Part bibliographyArnold, Janet. Patterns of Fashion: English Women's Dresses and Their Construction, c.1660-1860. New York: Drama Books, 1984. Baumgarten, Linda. Costume Close-Up: Clothing Construction and Pattern, 1750-1790. Williamsburg, Va.: Colonial Williamsburg Foundation and Quite Specific Media Group, 1999. Baumgarten, Linda. What Clothes Reveal: The Language of Clothing in Colonial and Federal America: The Colonial Williamsburg Collection. Williamsburg, Va.: Colonial Williamsburg Foundation in association with Yale University Press, 2002. Fashion: A History from the 18th to the 20th Century. Taschen, 2002. Ribeiro, Aileen. The art of dress : fashion in England and France 1750 to 1820. New York: Harry N. Abrams, 1983. |
Sunday, June 06, 2004
Final photos of the dress with trim from the GBACG Travellers in Tuscany event; dress modeled by Bridget.
posted by démodé 7:41 PM Wednesday, February 04, 2004
Since I'm in between projects (still need to get fabric for my 1830s pelerine and waiting for help from Bridget and Heather to start my 1910s corset), and because I'm thinking of wearing this to the Gaskell ball in late February, I hauled this out one last time to finish the stomacher. I've known that I was going to do something based on the ruched trim design from the skirt, and I'd even gone so far as to cut out the fabric strips for this piece. I had a bit of trouble deciding on what sort of shape the trim should make -- I knew I wanted it to be vaguely circular and yet with a V (hello slimming!). I experimented a bit with connecting the "S"s from the skirt trim and futzed with where the bows should go, and came up with this. I drew a stencil starting with the shape of the stomacher, drawing a measured grid so that I'd get the pattern reasonably parallel. Then I drew an outline where the center of the trim would go, cut out the center, and drew around the cut out edge of the stencil to make my design. It took me two evenings to hand pleat/sew the trim in place. I then sewed one edge of the stomacher to the underbodice front, and I'm still working on hooks and eyes for the other edge. I'll post final photos of this project after the ball.
posted by démodé 10:31 PM Tuesday, November 04, 2003
So now that I actually LIKE this dress, I'm all inspired to finish trimming it before I get back to my 1830s day dress! I'm basing the skirt trim on a dress shown in the Kyoto Fashion book -- serpentine ruches in an S shape, with a bow on one side of the S. I'm hand sewing these as well -- again, necessary for working with the straight grain, plus getting the robings and skirt under the sewing machine is more trouble than it's worth. I've finished one side of the overskirt, which has only taken me about two evenings. I first measured the length of the skirt and decided how many S repeats I wanted, then drew a stencil based on that which I used to mark a general line to follow. I then pinned each pleat in and stitched them down on each side. Luckily these ruches in the period were also sewn on by hand, so while I'm trying to follow a general spacing in terms of pleats, I'm not concerned about making them ruler perfect. I'm going to do an adaption of this serpentine ruche/ruffle on the stomacher as well, in a slightly narrower ruche (the dress robings are trimmed with 1.5" wide, the serpentine on the skirt in 2" wide, and the stomacher will have 1" ruches -- if you care!).
posted by démodé 10:46 PM Sunday, November 02, 2003
If you'd like proof that I am 100%, certifiably insane, look no further: I thought about going to PEERS' Bal des Vampires, but no one I knew was going. At the last minute, a good friend I haven't seen in years said he was going, so I changed my mind. This was on Wednesday, the ball was Saturday night. I thought about what to wear, and told myself, "Be practical. You have only a few days -- just wear something you already have in closet." I thought about wearing my black & white striped bustle gown -- it's pretty darn vampiric, but I wore that to the last PEERS ball I went to, plus I wore it for our Halloween party last weekend. What I really WANTED to wear was my robe à la française -- nothing says "vampire" to me than 18th century (why is that?). So Thursday night I hauled this out, ironed it (this was key!), tried it on, and it mysteriously fit better than the last time I tried it on! What IS that all about? My theory is that the linen underbodice stretches, but as I hadn't had this on in months, it seems odd that it would be BIGGER. But for whatever reason, it looked better -- primarily, the front edges of the robe came closer together (particularly at the waist), making a much more flattering V shape (hello slimming!). It still wasn't perfect, but it made me think it was salvageable. So I started doing some of the things I'd need to finish it -- taking apart the shoulder seams to refit the neckline and bodice length, putting in lacing holes in the center front underbodice, fixing the angle of the skirts -- all the while thinking "Don't kill yourself to finish this -- you'll never be done in time. Just relax the next few days and wear something you already have!" Well, Friday night and Saturday turned into a flurry of sewing as I finished all the changes mentioned above, made a temporary stomacher, made a ruffle for the petticoat front, and cut out and pleated/sewed -- BY HAND, mind you (I really wanted that pleated look that you just can't get with a machine sewn gathering stitch, plus I was using ruches cut from the straight grain [as they did in the period], and everything I've read has told me that it's much easier to control curving straight-grain ruches by hand) -- the trimming on the robings. I finished with enough time to stick some hot rollers in my hair, and to get the call from my friend that his ride had fell through and he wouldn't make the ball. So there I am, 6:45 on Saturday night, hair done and all ready to put on the dress and go. I thought about just skipping it, I thought about going, but then decided -- I look good, I have to at least go show off for half an hour! So I sewed the stomacher in (no time for hooks and eyes, and I don't trust pinning!), hoisted myself into the car and made it to the ball! Actually had a pretty good time -- met new people, saw some I hadn't seen in a while, had some great dances and stayed until the end. And that is the end of my story of insanity. There are more pictures of me and the ball on my Bal des Vampires page. Still to do: add more trimming to the skirts (I want to do something along the lines of the yellow taffeta dress in the Kyoto Fashion book) and the stomacher. The fit is still not perfect, but I've come to believe that that is because of (1) using a standardized pattern, and (2) using a pattern for something that really needs to be draped.
posted by démodé 10:50 PM Thursday, May 15, 2003
It's not that I haven't been working on this project -- it's that I'm really irritated with it! I thought I'd gotten everything fixed last week -- I've FINALLY found a good sewing circle (right before I move away!!), and thanks to the good deeds of Corrine and Cat, the bodice was adjusted to fit me better and the hem of the robe was marked. Corrine came up with the idea of making a pleat at the side seam of the bodice, thereby pulling a bit of the back towards the side and dealing with some of the horizontal wrinkle I had at the waist. I then sewed down this pleat, making it look exactly like the side seam. I did something similar to the skirt fronts, which were hanging open too wide -- pleated them up and then sewed down the pleat to look like a waist seam. All seemed lovely, so I went home, sewed in place all the things we pinned and put in a hem. And now it's mysteriously all wonky and ugly again! My hunch is that the lining, which is a linen/cotton blend, stretches when I wear it -- it's not that it's too big, it's that it seems to fit me differently each time I put it on. And I've decided that this silhouette isn't terribly flattering to me -- I feel like a big box. I need things that elongate my waist, and this stops just at the waist -- not an issue with the pattern, but an issue with the style of dress. What is an issue with the pattern though, and which only compounds the problem, is that there isn't enough of a V shape to the robe front opening. Another pattern issue which I haven't even begun to think about is the fact that the petticoat is box pleated in front, making it very full -- it seems that the petticoat needs a flatter surface to hold the trimming. So what to do? I'm not sure. Part of me just wants to finish the dress (throw some trimming on it and make a stomacher) and see if I can salvage it. The other part of me just wants to retire it for a while and possibly come back to it after in a few months. What I'll probably do is iron it to see if some of the fitting issues are just very-wrinkly-taffeta issues and try it on again -- if the fit is still really annoying, I'll probably stick this in the closet for a while.
posted by démodé 9:26 AM Thursday, May 01, 2003
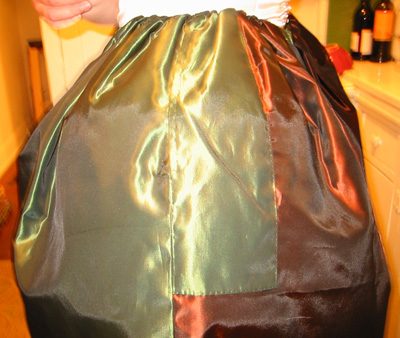
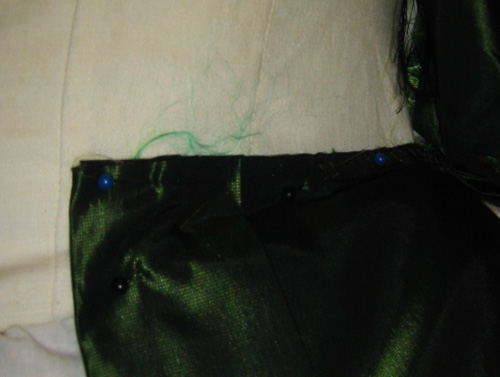
Spent the last week working on the petticoat (lots of handsewing on the couch watching Manor House). It's made in the same style as the cotton underpetticoat. In order to save a bit of the green taffeta for trimming purposes, I made the top half of the petticoat back out of some brown taffeta I had left over from another project. I've seen this done on period garments, actually -- there's a dress in Costume Close-up that uses plain linen for the top back of the petticoat. The idea was to make sure that any part of the petticoat that might show was in green, so in addition to making the bottom half of the back out of green, I added patches at the pocket opening (in case the pocket opening on the robe shows the petticoat underneath).
posted by démodé 10:52 AM Tuesday, April 22, 2003
Okay, I admit it. I tried to like this pattern, I really did. But I think the romance is over. I'm not ditching the project, but I have to say that I'm less than pleased with it so far. I tried it on again last night and realized that the sleeves were a wee bit too tight. So I remade the sleeves slightly larger, and in the process realized one of the reasons why I'm having problems making this fit correctly -- the bodice lining doesn't match the robe! The side seams on the bodice lining are about 1.75" farther back than the robe side seams! I resewed the lining sleeve so that it will match the robe sleeve in position, which helped. I do think this is salvageable, but I have to say that this is the last time I use a pattern that isn't custom-drafted for me. Fight the power! posted by démodé 11:38 AM Sunday, April 20, 2003
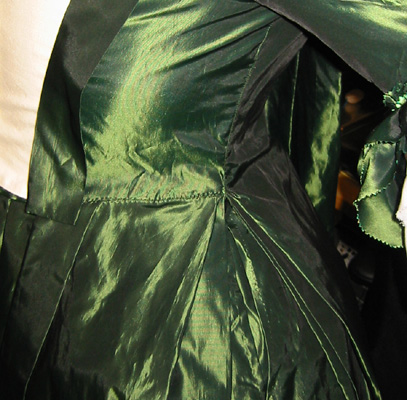
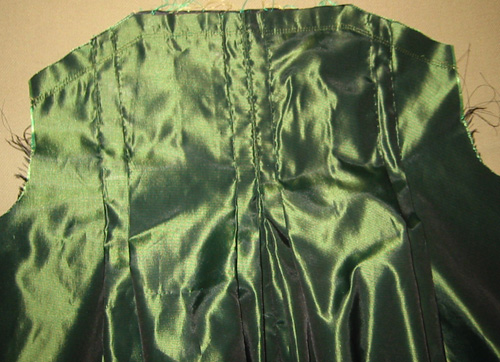
Oh ye of too much faith... fitting this thing has not been exactly a nightmare, but it hasn't been pretty either. I started with the back pleats, which went together more easily than the rest of the robe, and that's saying something. It's actually technically not too challenging -- all of the pleat lines are marked, and the order in which they are pleated is clearly explained in the pattern directions. However, it has to be exact, both so the pleats hang correctly and so that they two sides match each other. I marked, pinned, and repinned so many times! Finally I got it into a passable state, and hand sewed the pleats in place. Next came the bodice front. I successfully put in the dart in the arm piece and ironed in the robings and facing. BUT when I attached the bodice front, the side seams were too long! Normally, this wouldn't be an issue -- you'd just cut the waist higher. But since the back piece is all one piece, and there's a right angle where the skirt extends out from the back at the bottom of the waist, I couldn't move that seam line. I pinned, swore, traipsed around in my corset and pocket hoops, pinned, and swore some more. After lifting the seams at the top of the arms, I got it (again) into a passable state. This of course completely screwed up the arm holes, and I had more fun pinning, swearing, and traipsing around in my undies as I fitted the sleeves. I was so irritated with all of this that I didn't have the heart to document it with photos -- you'll just have to use your imagination. Finally I got to put together the skirt, which was fun and easy. The pleats at the side are really pretty (although my pocket openings are hanging at a weird angle -- le sigh). Then I pinned the skirt to the lining waist and sewed that on. Next I need to attach the robe bodice to the lining -- one change that I made (in addition to making a separate bodice front and skirt) was to angle the sides of the robe more at the bottom. When I made my first mockup (below), I felt that there wasn't enough of a V shape in front, which is necessary to avoid looking like a big sausage. So here we are! It's very wrinkled, and the skirt robings were ironed in place but not sewn, so they're coming open in these pictures. Note lovely hausfrau scarf.
Side Note: I've spent a good deal of time in my corset because of the number of fittings I've had to do, and I have to report that this is the most comfortable of all of my corsets! Lots of good support and not too much compression. Yay! And I've gotten lots of practice at walking around the house sideways (wearing my pocket hoops). posted by démodé 6:42 PM Saturday, April 12, 2003
The lining version 2.0 is finished, and I've completed a number of mockups to ensure a (hopefully) perfect fit! I redid the bodice (version 1.0 was too short) -- it's not quite as nice as the first version, as I machine sewed some things that I had done by hand previously, and one of the pieces of boning in the back is slightly off its angle. But I didn't have the heart to redo it, so wonky it is! Luckily no one will see it. After I finished the lining I put this project down for a bit, as I knew I wanted to make some changes to the pattern that would require geometry and draping, and I was putting them off. The main change that I wanted to make was to recut the bodice front as a separate piece. From all of the research I have done, I would date this pattern to the 1740s-50s -- the one piece bodice/skirt front is the real deciding factor. Since I'm aiming for the 1760s, I wanted to be sure to have the separate bodice front which I see in most portraits and patterns from this decade. I recut the bodice front using the bottom of the lining piece as a guide. One critique I have of this pattern is that the pattern instructions, and especially the drawings, aren't as clear as they could be. For example, it took me a WHILE to figure out that the pleat in the front of the bodice goes on the OUTSIDE (ohhhhhhh!). I couldn't figure out why they'd want to have this huge pleat of fabric inside the bodice -- I was assuming the pleat was for fitting purposes, but you didn't need THAT much fabric! Once I figured that bit out the rest worked well -- had to redraw the armscye and lengthen the bodice length. I originally planned on not changing the bodice back pattern, as I hadn't needed to make any changes to the bodice lining. Luckily I listened to the little voice in the back of my head that kept saying, "Make a mockup!" When I did make a mockup of the top of the bodice back, I found I needed to redraw the armscye and (I already knew this) lengthen the pattern.
I'm finally on to cutting out the fabric, which is scary as I know going into this that I really need 1-2 yards more than I have. I'm puzzling a bit over the skirt length -- the pattern recommends adding the same amount of length to all of the pattern skirt pieces, which are currently all 16" long. How does that account for the difference in skirt length over the side hoops? I'm not sure, so I'm cutting all of the skirt pieces extra long so that I'll have room to play with (I figure any extra I cut off can be used for trim). posted by démodé 10:35 PM Wednesday, April 02, 2003
Wah! Impending rework! The bodice lining is too short! I finished the bodice lining this past weekend. All went swimmingly, including the previously-incomprehensible facing (which, I must admit, I found a pattern piece for). Even went so far as to hand sew various parts of the lining and hand-work the back lacing eyelets. But when I tried it on, it was too short! It's about an inch too short all around at the waist, and as I've decided to redraft the bodice pattern so that the front is a separate piece, I need the bodice lining to fit perfectly (so that I have something to which to sew the bodice). Plus, this outfit is already making me look even more short-waisted than I already am... I don't need any more help! So after grumbling and throwing it all in my sewing basket for a day, I've recut the bodice lining front and back, plus the facing and the under placket in order to redo it all. At least it'll all go together easily now that I've had practice!
posted by démodé 9:51 AM Monday, March 17, 2003
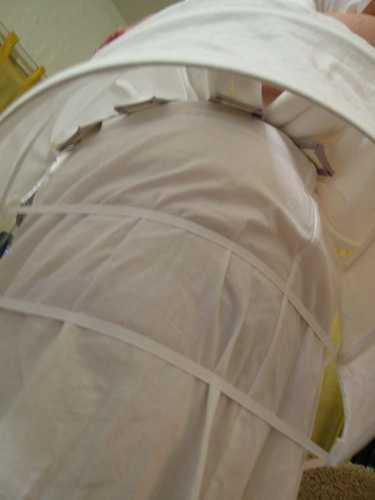
I used to be able to just live with costumes that weren't perfect. Something didn't fit right, didn't look the way I wanted it to, and I accepted that life just sucked. Maybe it's that I've become a better sewer and costumer, but in spite of my best attempts, I just can't do this anymore! I wasn't happy with the shape of the pocket hoops, but since they were done, I tried to talk myself into living with their overly boxy shape that just didn't work on me. I think it's my large waist-to-hip ratio -- things that would lie flat on someone else's hips just don't on mine! However, last weekend I finally accepted fate and reworked the pocket hoops. I knew I either needed to widen the part of the pocket that rests against my hips (and therefore the bottom), or lengthen the part of the pocket between the top hoop and the waist. Adding extra fabric to the stuffed area seemed hard (plus the waistband was annoying to sew), so I started by cutting open the pocket inside and bottom. After lots of futzing, I realized that the easiest thing would be to cut out the pocket inside and bottom, finish those edges, and pull the edges of the pocket together with ribbon. I already have a separate tied-on pocket that I made for my 1840s outfit, so I don't care about losing the "pocket" part of the pocket hoop -- plus, I'm not convinced about the idea of gloves, fans, etc. rolling around inside the hoop. I then pinned the pocket closed at various widths, and have now come up with an appropriately sloping-top pocket hoop! I also added ties that pull the pocket hoops towards each other in the front and back -- I ran out of ribbon on the front, so only the top wire is tied.
Of course, this meant that I had to rework the petticoat, as my waist to floor measurement over the hoop was shorter. I unpicked the waistband, cut off 4" from the top of the petticoat that goes over the hips, resewed the waistband, and added a hem. The undies are now complete (except that I need some silver ribbon to lace the stays straps and the shift drawstring).
posted by démodé 9:59 PM Tuesday, March 11, 2003
The moral of the story is: overkill is better than underkill. I went down the LA Garment District on Saturday to buy hoopwire, and also to pick up some lining fabric (found a nice off-white linen/cotton blend that wasn't too expensive). I had originally thought I'd need to buy wire cutters, but my husband informed me that we already had some! Yay! When I got home that evening, I decided to test cut a piece of hoopwire, and the wire cutters did nothing. Nada. Grrrr! My fabulous husband offered to go out to the hardware store to get some real wire cutters. He brings them back, we try to cut the hoop wire, and these wire cutters only manage to bend it. Double grr! So at this point, I was so pissed off that I marched over to Home Depot and bought bolt cutters. Yep! I'm a big fan of overkill! And I can safely report that bolt cutters DO cut hoop wire. I wasn't sure what to use to finish the raw ends of the hoopwire -- I saw some neat hoop wire end-y thingies at Farthingale's, but I wanted to finish the pocket hoops right away. I ended up using some non-acidic masking tape from my husband's art supply stash, which seems to be working. I'm not too positive about how much I like these pocket hoops. Yes, they work, but I think they may be sized for someone with flatter hips than I (they are the mythical "one size fits all"). I feel like they are VERY vertical on top, and I feel like the outer edge should be more perpendicular to the floor. However, mine turned out very much like this pair reviewed on the GBACG's Great Pattern Review, so I guess it's the pattern. It's certainly not that nice curved 1760's silhouette I was thinking about -- much more of a boxier shape (is this more typical of the 1740's-50's?). I am going to add ties at the CF and CB bottoms to pull the sides in towards each other -- hopefully this will tone down the boxiness a tad.
Apres the hoopwire fun, I went on to making the under petticoat, following the directions from the JP Ryan pet-en-l'air/robe à la française pattern. This worked out well -- I just need to put in a hem. I don't have any pics, but the hang of the petticoat over the pocket hoops is definitely squarer than I'd hoped... I'm hoping once I've hemmed the petticoat, and used the stiffer taffeta for the over petticoat, the skirt will have a slightly less boxy shape. Normally I would then have gone on to make the official dress petticoat (always work from the inside out!), but as I know I don't have enough yardage for this whole ensemble (I need about 11 yds. plus extra for trimming, but I only have 10) I want to wait on the petticoat -- I'm planning to piece it so that the areas that don't show are made of a different colored taffeta (I have some leftover brown and black from other projects). Instead I worked on the bodice lining mockup. I have to say, JP Ryan could have some slightly clearer pattern instructions, especially in terms of her illustrations! There's some facing deal that goes on the bodice front, for which there is no pattern piece and the instructions are totally unclear -- out of nowhere, you're just supposed to attach "the facing" (as though you're supposed to know what this facing IS) to the bodice front. I'm going to email the proprietess of JP Ryan, and hopefully she'll clarify. But ignoring the facing, all went swimmingly! I originally thought I'd need to add some width at the waist as my measurements don't exactly fit the pattern measurements. However, I ended up taking that width off as soon as I tried it on. The only real change that I needed to make was to pin out a tiny bit off fullness in the bodice front length between the shoulder and the bust. There's a handy little deal in the back where you put in boning and lacing holes up the back, and then you can tighten and loosen the back lining underneath the dress. However, there wasn't TOO much fullness for me to pin out at the center back, and I'm wondering if I should add any width there so that the dress is more adjustable (in case my body decides to change sizes at a later date?). The nice thing about this is that I won't have to worry about always lacing my corset to the same measurements.
posted by démodé 9:08 AM Wednesday, March 05, 2003
I'm back on track with the pocket hoops! Got them all cut out, marked, and started assembling them last night. So far everything is going swimmingly, except that I've been lazy about the "what's going to stiffen these" question. If you'll recall, the reed idea didn't go over too well. Lots of sites I've seen have recommended using plastic boning, which seems a bit flimsy to me. Some h-costumers have recommended using hoop wire, which seems much more reputable to me -- but then I have to either mail order it or slog to Pasadena (AlterYears) to buy it, plus buy wire cutters to actually cut the stuff. I have to decide soon as I'm already finding other projects to get obsessed about -- I'm determined to stay on target! And I really am going to get a "concept" drawing up soon! posted by démodé 1:16 PM Monday, March 03, 2003
Realized that I need a shift before I can move on to other items, so in between a busy weekend I drafted up the basic shift pattern from Costume Close-Up (by Baumgarten & Watson). For those of you who are interested in 18th century clothing and haven't already looked at this book, go! run! read! Not only does it include scaled patterns, but it details exactly how each seam was draped and stitched. Even though I won't be using most of the hand sewing techniques, my understanding of how exactly 18th century clothing was put together has been GREATLY improved. The shift was relatively easy -- it's all based on triangles and squares. My only irritation was that I was using French seams, and kept sewing one of the sleeves wrong side out -- TWICE! Finally got it right on the third try (I kept trying to tell myself that it didn't matter, it was underwear, but of course that didn't last for long). Here's a photo of my overly exciting basic white cotton shift. Over it I'm wearing my 18th century stays...
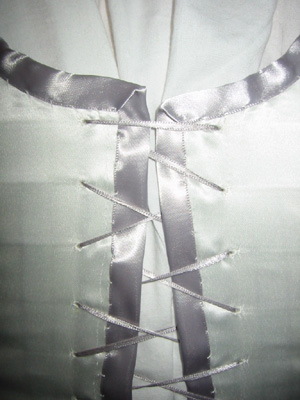
...which I made (the first draft, anyway) at Costume College 1.5 years ago. It's made of two layers of corset coutil, with a plain muslin lining and white satin for the outer layer. My three irritations with it are: I'm not too hot on the silver/grey ribbon that I chose to edge the stays with, but there's no way I'm doing THAT over! whew, was that a pain -- all of it had to be hand sewn! Also, the pencil lines that I drew for the boning channels shows through the white satin. And finally, no matter how far I cut up between the hip tabs, the stays still dig into my overly abundant hips at the sides. On the plus side, this was my first ever corset (my Victorians I bought from Amazon Drygoods -- $100 and worth every penny! SO comfortable and very sturdy -- I don't buy the "corsets must be fitted to you" argument -- that's what LACING is for, sillies!), and I'm very impressed by my dedication in making hand-sewn eyelets (which I must credit the Renaissance Tailor for their clear, useful instructions). Not only are they period, but they make tightening up the laces a dream! Granted, I had to use a leather sewing needle to get the ribbon through the teeny holes, but now when I tighten the lacings, they "hold" where I've tightened them. Which means I can get in and out of it by myself (okay, yes, I generally need help actually hoisting it over my head)! posted by démodé 11:24 PM Saturday, February 22, 2003
Foiled by evil Joann's and Michael's! I was all set to whip out the pocket hoops this weekend, so I went to Joann's and then Michael's in search of reed to stiffen the pocket hoops. According to the "I don't get paid enough to be nice to customers" (and hey, I'm not faulting her -- neither would I!) saleslady at Michael's, "We don't carry any reed at all." Same situation at Joann's. So now I have to wait while I order some hoop wire from AlterYears. I'm sure all will be well in the long run, as I suspect hoop wire will do its job better. I'll probably put the pocket hoops together this weekend anyway and then just add the hoop wire when I get it. But my instant gratification has been foiled! posted by démodé 8:15 PM Thursday, February 20, 2003
So a woman's prerogative is to change her mind, right? First, I've decided to go with the J.P. Ryan patterns rather than Mantua Maker. For one thing, I like the style of her pocket hoops better than Mantua Maker's. For another, Mantua Maker's robe à la française pattern is not individually sized -- meaning, it only comes in small - medium - large - etc. When I used her combinations pattern, I found that the difference between sizes made for an imprecise fit. Also, the thing that was scaring me off of the JP Ryan pattern -- the fact that the pattern was for a pet-en-l'air (which I have learned from the pattern instructions means "fart in the air" -- what's up with THAT?) and not a full length robe -- didn't turn out to be so scary: I just have to add a certain number of inches in length to the pattern pieces. The pattern arrived about two days ago, and I've been poring through her very detailed instructions. My favorite instruction comes when you put together the back pleats: "1. Don't panic. This is easier than it looks." Fabulous!
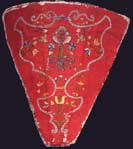
Further contemplation of this dress has made me abandon the extensive embroidery plans that I had, instead settling for a more reachable goal of only embroidering the stomacher. Since I'm limiting myself this way, I decided to actually recreate the embroidery from an existing stomacher:
I still haven't decided on the color scheme -- all of the dress and petticoat will be green, with a white stomacher -- but I'm not sure whether to do the embroidery in the original colors or in a more monochromatic varying-shades-of-green effect. I am worried about fabric yardage -- it looks like the dress needs about 8 yards of 54" wide material (I *think* mine is 60" but I have to check), and the petticoat needs 3. I only have 10 yards, so I'm thinking of making the upper back portion of the petticoat out of another color taffeta (I have a bunch of brown and black left over from other projects). I'm not at all sure if I'll have enough fabric left over to do any ruching, but the worst thing that happens is that the robe will be understatedly elegant! One more thing I'm mulling over is petticoats -- how many under petticoats (not the dress one that will show) should I make? JP Ryan recommends making a quilted under petticoat that will hide the hoop line. I'm not sure how necessary that is -- I'll probably end up going with 1-2 under petticoats made of cotton muslin (it's cheap!). posted by démodé 4:58 PM Sunday, February 09, 2003
Most of my mental costuming has been going into this project, a 1760 robe à la française. While I'm not sure of the final concept design yet, I have decided on the 1760s. I like that silhouette best, as the side hoops have a rounded shape at the top, as opposed to the boxier shape of earlier dresses. While I'm not overly worried about making this dress specific to one country, I am going to stick with the French convention of robe and petticoat being the same color. As this is my first attempt at the 18th century, I don't feel up to drafting my own pattern for this project. I've been looking at lots of scaled patterns in Arnold et al, and I'm going to use those as a guide. However, I've decided to use a commercial pattern as a base. It seems like everyone likes the JP Ryan and Mantua Maker lines best. I think I'm going to go with Mantua Maker, as I've used her patterns from other eras and been very happy with them. Also, the JP Ryan pattern is for a pet-en-l'air (which is a shorter version of the robe à la française) which you can extend longer, whereas the Mantua Maker is for the full robe. I've been mostly consumed with thinking about how I'm going to decorate this. It seems like there are a number of options: self-trimmed ruches; lace, fly fringe, etc., and embroidery. Since I'm worried about the amount of fabric I have, and have been totally inspired by the amazing work of costumer Bjarne Drews, and am an insane masochist/have way too much time on my hands, I've decided to go with embroidery. I've been looking at tons of books on 18th century embroidery, and as I was looking for pattern inspiration, I came across this Absolutely Completely Gorgeous 18th century apron for sale by Karen Augusta. WOW! I played with the images in Photoshop, printed them out in black and white and traced the elements that I liked best (I didn't want to make it quite as complicated as the original). Here's what I came up with: petticoat hem, skirt side, and stomacher. Of course, after I showed this to my husband, he sensibly asked me, "And you're going to do all this when?" Okay, okay, given my ability to get distracted, I've scaled back my initial thoughts to just embroidering the stomacher. I figure that I can then later add the embroidery to first the petticoat hem, and then the skirt sides, if I manage to stick it out. posted by démodé 11:41 PM |
)
)
)
)
)
)
)
)
)
)
)
)
)
)
)
)
)
)
)
)
)
)
)
)
)
)
)
)
)
)
)