
démodéadjective:old fashioned, out of style, unfashionable [from French, the past participle of démoder "to go out of fashion," from mode "fashion"].the concept
the fabric
the patterndraped by me the resultuseful linksInspirational images:
Reference: bibliography
|
Monday, July 17, 2006Remember this guy? Well, I did finish it, well in time for its first wearing... but I've had a terminal case of laziness, and this here site has been suffering. The only real things that I did since the last post was the trim around the neckline. I cut a long strip, on the straight grain and with pinked edges, of self-fabric which I hand-stitched to fit. I love this method, as you just pleat as you go. If you look at most 18th c. dresses, they weren't worried about making sure every pleat was evenly spaced and had an even repeat. So you can just make a little tuck, take a stitch; make a little tuck, take a stitch. The polonaise-ing looked so cute in the last photo that I decided to add ties for that option -- but I wanted to avoid the usual thing of using long ribbons to pull up the skirt (from the famous polonaise in Janet Arnold). Instead, I used the technique used on another polonaise in Janet Arnold, where little loops are sewn to the side seams and then tied underneath to ties at the waistline -- the same method that many modern bridal dresses are "bustled." I had to experiment a bit as to where to put the ties -- I ended up putting the ties on the skirt farther towards the back than the exact side. I also made engageantes to go with this, but I made them using the same style as is worn with a sack gown (shorter in front and longer in back) -- and they just looked dorky, so off they came. I may at some point make some short, same width all around (3" or so) lace cuffs. Et voila! I wore this on Saturday at the inaugural Societe des Lumieres Bastille Day picnic, photos and report from which are forthcoming.
posted by démodé 2:09 PM Tuesday, June 13, 2006To quote the muppets: movin' right along! (Best muppet song ever) I went to Hawaii (for work, poor me) for the second half of last week, and now I have this week off! Hallelujah! So I grabbed some costume movies and hit the couch for some hand sewing. I hand sewed all of the bodice edges, plus finished the inside skirt/bodice seam with a bias strip. The best part is pinning the bodice works perfectly. I need to invest in some standard silver-only pins (mine all have those colored tops), but it works perfectly. Yay! And it fits! The big issue is still the gap-osis in the bodice neckline. I've pinned it as well as I can (I've fixed this angle twice) and it's still not dealing with it -- I'll probably put in a casing and drawstring as I did on my last anglaise. Now I just need to finish that bit right at the armhole strap and the center back edge, and add engageantes, and I'm done!
And usually I'm not a huge fan of the polonaise, but look how cute this looks! So I think I'll need to add ribbons and buttons so I have options.
posted by démodé 8:52 PM Tuesday, June 06, 2006There's been ever so much productivity -- well, last weekend, anyway! First, thanks for all your input, which encouraged me to go with my robe à l'anglaise idea. Next it was on to the petticoat. Since the fabric was so sheer, I used way more yardage than I normally would -- I think I ended up with something like 180" around (usually for 1780s-90s I go with 130-140"). Luckily I have the handy skill of being tall enough to turn 45" long fabric crossways to use the selvage for a hem -- fabulous since there would have been a LOT of hemming to do. It's hard to tell in this lighting, but you can really see the sheerness floating over the underpetticoat and it's really working for me.
Then I put everything on my dress form and guesstimated the skirt length -- I usually figure out the CF, CB, and sides and then just angle the skirt fabric as I pleat, and it all seems to work out. The length was good so then I sewed everything together. Ignore green tank top underneath, sorry about the bad angles here.
I am continuing to get neckline gappage -- I've already changed the angle of the strap that goes over the arm once, and I can tell I'm going to need to do it again. I'm going to leave that for last after I finish all the edges. Since I did this all on the machine, I'm doing a bit of a cross between 18th and 19th c. sewing techniques. I'm going to use a bias strip to finish the bodice hem where it is sewn to the skirt; the rest of the edges (along the bottom point, CF, and neckline) will be turned in on each other; I'll do the bind-over-the-edge technique that you often see for the top edge of the CB. Hopefully this will all work! In the above pics, I tried to pin it shut the way I thought I would for closure. It looks relatively good with a bit of wrinkling around the waistline -- this might be because I hadn't yet turned under any edges or notched the seam allowances. I hope. I measured and pinned the CF edges with a bit of extra underlap on one side (about 1/2") so that I have some room to play with when pinning. posted by démodé 10:36 AM Thursday, June 01, 2006I'm so back into this whole sewing thing - yay! (For a while there, it was "Sewing? What's that?") Tuesday night I put together the cuff. I pretty much just winged it by cutting an angled piece that was 2x the width of the area I wanted to cover, plus a little extra length for ease. Then I ironed under the edges, gathered those, and ran gathering stitches lengthwise in between the edges. Pin, gather, sew - done! Then tonight I attached the sleeves:
Now, it's a woman's prerogative to change her mind, right? I remembered that I had a bunch of this very sheer white poly/cotton that I bought years ago, when the concept of a poly blend didn't send me for the hills, for a Regency dress. Well, that ain't going to happen, but I was eyeing the sheer 1790 embroidered petticoat in the Kyoto Fashion book and thought "Hey, maybe this wants to be an anglaise?" So I pinned the bodice, petticoats, and various skirt options on my dress form to decide. I tried asking my husband, but he said (when he saw the anglaise option - and I quote), "It looks like you opened the skirt to take a pee!" Ahem. Philistine. So I turn to you. Btw, please note cat on the bed who says, "LASERY! Please turn off the light, Mommy!"
I like both options! I think I'll definitely make the sheer white petticoat either way -- it'll go nicely with late 18th c. jackets. But the conundrum is whether to make this dress an open or closed robe. In a way, I think the white petticoat is jarring, but then I think the closed robe doesn't have much differentiation due to the pattern. What to do? posted by démodé 10:31 PM Tuesday, May 30, 2006And the moral of the story is: when all else fails, always go back to period sources. As I last posted, I was working on patterning the sleeve, as I wasn't happy with my patterns from previous projects. I futzed and futzed and finally came up with something that fit the armscye and certainly fit around my arm, but was huge and looked very Laura-Ashley-puff-sleeve. I thought about just going with it -- I've been enjoying using this project to get back on the proverbial sewing horse -- but then realized that I wouldn't be happy with the project if the sleeve sucked. So I hauled out Janet Arnold, drafted up one of the robe a l'anglaise sleeves -- and found it fit perfectly with about 1.5" added width and some tweaks to the hem. Yay! For comparison, here's the finished Arnold sleeve laid over my previous attempt:
Then I assembled the sleeves and linings, but I haven't yet attached them to the dress as I want to figure out how to do those shirred cuffs you see in the 1780s. I'm trying to figure out whether they're rectangles that are more closely gathered over the inside of the arm, or whether they are shaped previous to gathering. I'm excited as I have more than enough fabric to make the skirt and for self-trimmings. The skirt should be easy, then I'll just need to finish my edges and add engageantes and closures. Another thing I'm thinking about -- I usually bone edges on bodices like these, but I've been wondering whether it's needed. When I think about it, I don't think I've seen CF boning on period examples. Has anyone done a hook & eye (or pinned shut) closure on an 18th c. bodice and had it work unboned? posted by démodé 11:37 AM Monday, May 29, 2006Working on this dress reminds me that what is really exciting about it is the fabric. I've always thought that plain/solid fabric needs an intricate cut & trim, while interesting fabric needs to be simple. In other words, I'm feeling validated about my ditching-the-caraco decision. Not trusting ANYTHING after the jacket debacle, I took my pin-fit mockup and sewed it together, all was well:
Then it was on to cutting. I quickly realized that this print has no side-to-side repeat/mirror/whatever you want to call it, which was fabulous as it liberated me from trying to match bodice pieces (a quick check of my image files showed lots of 18th century print gowns that totally don't match -- yay!). No handsewing this puppy for me -- I got my temporary basting spray out (I LOVE that stuff) to glue my fashion fabric, silk organza interlining, and cotton muslin lining together, and quickly sewed everything together. I really like the back seaming, the mismatching print really shows it off and it's tres chic in my opinion.
One look at my sausage arms and I was off to the sleeve. The sleeve on my 1780s jacket, which I adapted from my robe a l'anglaise, fits a little tight so I decided to make a drapeable mockup. Of course, it's Really Hard to drape a sleeve on yourself! This must have a bigger armhole than my jacket as I didn't have any fabric to pleat at the sleeve cap, so I futzed around for a while and came up with this:
I need to do a second muslin tomorrow to be sure that the fit is okay -- now it's off to bed for a good night's sleep so I can get a decent amount done on this tomorrow! (Why isn't everyone else up at 1:30am? Yay holiday weekend!) posted by démodé 1:39 AM Wednesday, May 24, 2006And so the Caraco à la Parisienne becomes the Roundgown à la Parisienne. So here's the deal. Having a website (or blog or LiveJournal) is really cool, mostly because I get to share my geekery with all of you, but also because it keeps me honest. One of the reasons I tend to sew so much is because I get feedback, and then I start to feel like everyone will KNOW if I slack (WWKD?). But this past semester (I work at a university, my life is split into semesters) has been so busy that I haven't sewed much. And now with the 1780s jacket fitting debacle, plus the hassle of trying to drape this caraco -- my heart just isn't in it. I feel a bit lame, like here's this really hard project and I'm wussing out on it, but the reality is it's my fabric, my time, my dress and if I want to make a simple roundgown (which was, actually, the original plan when I bought the fabric) -- well, then I can be a wuss! (I'm trying to convince myself here...) I can report on the caraco, however, that it's doable. Two different people have contacted me (Sam and Alexa from La Couturiere Parisienne), and I can report that A) it is doable, B) there is a side seam (thanks to Julia for looking at the original dress at the V&A for me!), and C) if anyone wants to take up the gauntlet and make this dress work, it's all yours! So this is what I'm up to instead. My original plan when I bought the fabric was to make a simple 1780s roundgown, and I've come back around to that idea. The basic idea is to do something simple a la the Dutch round gown in the first picture; you can see my basic sketch here too. I want to do some interesting seaming, so I'm basing the back on the 1775-80 polonaise sketch from Costume in Detail. And I love the look of Greta Scaachi's chintz gown from Jefferson in Paris. It will have shirred sleeves (maybe neckline too?) and engageantes; I'll wear it with my big honking 1780s capote.
Since my 1780s jacket turned out so weird, I decided I'd better start over with my bodice drape. Also, I wanted to futz with it to see if I could get a better fit at the neckline, so instead of pushing the excess fabric into the neck area I moved it to the CF area. We'll see if that works!
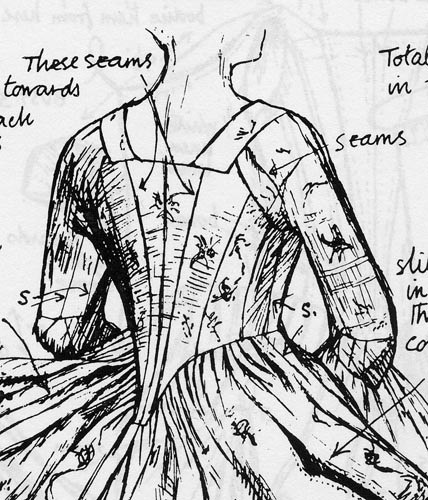
So, in summary -- I'm wussing out. Yay for a less stressful, hopefully more enjoyable, project! posted by démodé 3:44 PM Monday, April 03, 2006An Ode to Why I Currently Hate This Dress: Oh ye caraco of mysterious seams Where might you be sewn together? If you don't clarify yourself to me(ns) I will have to part from you forever *bows* Okee dokee, here we go. Of course my plan to ignore the cut-in-one seams didn't last very long, and I have since been pulling my hair out trying to reproduce the cut of this sucker. I have pictures of this dress (see side menu). From the V&A site, plus some I took in person (little did I know the questions I would have!). I have a line drawing of the supposed construction, from Historical Fashion in Detail. I cannot figure out how this fricking thing goes together. To wit: Line drawing and description. Note text bit about back cut in one with the sleeves; note side back tucks are only tucks, not seams; note back waist seam but front cut in one. There is no way for the front to be cut in one with the back AND the sleeves, it just wouldn't lay out correctly flat (the front would overlap the sleeves) -- plus you need a seam to connect the side back skirting piece. Now, looking at the line drawing, we assume that there are side seams placed directly where one would place a modern side seam (we'll come back to this). We will also assume, based on the rule that skirt lines that don't go all the way to the waist indicate folds, while lines that go all the way up indicate seams. We will also assume that the person who drew this actually looked at the dress seams.
Now we turn our attention to our photos of the dress and compare. Weirdness: 1) I can't see ANY bodice side or side back seam on the actual photos of the dress. I might see what look like triangular side insets/gores in the skirting (as shown in the line drawing above), but those might just be folds. 2) It seems to me to be relatively unusual to see the equivalent of modern side seams on an 18th c. dress. I have seen it sometimes, but usually they're placed 2-3" towards the back, even when having a pocket slit and/or hanging over a pocket hoop (check Bradfield, Costume in Detail. Many of the side pleats hang towards the back). 3) Am I wrong, or do not 18th c. sleeves generally have a seam towards the back of the arm (rather than the underneath)? As I found while draping this sucker, the only way to have the underarm seam "connect" is to place it not directly under the arm, but towards the back of the arm. That sentence wasn't English. Pics, with boosted contrast and my notes:
WTF? I keep telling myself to just give up and put in a modern side seam, but that bugs the historian in me, plus it means that I can't cut the sleeve in one with the bodice back (picture it -- you drape the bodice back, then you go up, over, and under the arm to make the sleeve). posted by démodé 10:01 PM Monday, March 27, 2006This dress is about three different things: Thing the First: When I was in Paris last summer, I wanted to buy some fabric so that I could have a Paris Dress. I didn't find anything interesting except some knock out cotton prints that were dead ringers for 18th century prints. They weren't cheap (now I can't remember! $8 or $9 a meter?) but they were way more affordable than if I tried to buy them online from the States. Thing the Second: GBACG is having an 18th century event (throws confetti in the air) in August; Let Them Drink Wine shall be our opportunity to dress smashingly, go wine tasting, and picnic at Chateau St. Jean winery in Sonoma. Thing the Third: I have formed a group of costumers called La Société des Lumières, for SF Bay Area people interested in creating 18th century characters and organizing events where we are in costume, in character, and in period. Yay! I'm WAY too excited about it, and I hope it will be an outlet for my desire to immerse myself in the period and create a character without people looking at me funny or asking me about traffic on the way to the event. So! This shall be the first dress made specifically for Sophie Thérèse Victoire, Comtesse de La Vallière; just a little something she had made for her in Paris to wear to picnics and the like. (Waves fan in silly aristocratic fashion, speaks in crAzy French ac-CENT). Ahem. Oh right. The costume? Yes. That. So it's a caraco and petticoat, from the 1770s and worn over side hoops. It's the fabric that drew me in -- I was looking for something in an indienne print to reproduce. Digression (with a point, wait for it): why do we costumers (okay, not all of us, but me anyway) feel compelled to Exactly Reproduce things? Yes yes it's more of a challenge, but still. I could take what I know of 18th century styles and construction and make this dress look perfectly lovely and it would be perfectly period, but I get really irritated at the thought of deviating from Reproducing It Exactly. What's the point here? Well, this caraco has a really weird construction. To wit, from the V&A website: "The caraco is ingeniously constructed. One T-shaped piece of cloth forms the back and the sleeves, which fold over the arm, forming a raglan sleeve in the front. The back is shaped using tucks rather than the more usual pleats or seams." Ingenious, yes. Easy to reproduce, no. Luckily (ha ha) there is a diagram of the seams in Historical Fashion in Detail, and I have some close up shots from when I went to the V&A last summer, so I can see How They Did It. Which is really hard. I started with the back. All went well until I went into the cut-in-one sleeve, which is Not Easy to drape on a dress form without arms. After experimenting for a bit, I hit on the solution -- why don't I just make a normal 18th century sleeve, rather than raglan which is unusual for the period? Sounds perfectly reasonable to me right now, but for a few hours that was just grating on me like nobody's business. Okay, let's do it easy. Normal 18th century sleeve. Check. On to the front. So far, all is going swimmingly except for the things that are Driving Me Crazy: the front piece is cut in one in terms of the bodice and skirting, and I'm getting a big wrinkle at the waistline (to be expected, yes, but why is the original not doing that? Possibly because the side hoops on the mannequin aren't as enthuasiastic as mine, but! still!); and I can't get the angle of the front robing to lie correctly. If I get everything nicely fitted around the bodice, I end up with all this extra fabric over the bust-to-shoulder area. I looked at the 1740s caraco in Janet Arnold which has a similar front, and that's all cut with the robing on the straight and no funny business. I looked at my JP Ryan française pattern, and saw that she takes a dart in the shoulder-to-bust area that is hidden under the robing... this works, but I have such a huge dart that it's beyond a dart -- it extends past the robing (see pic, haven't cut out the armhole yet b/c of all of this experimentation). So should I just stop calling it a dart, and make it a slit? Or is there something that I'm missing? Back to studying Arnold and grinding my teeth.
posted by démodé 10:32 PM | |||||||||||||||||||||||||||||||||||||||||||||||||||||||
)
)
)
)
)
)
)
)
)
)
)
)
)
)
)
)
)
)
)
)
)
)
)
)
)
)
)
)
)
)
)
)
)
)
)
)
)
)
)
)
)
)
)
)
)
)
)
)
)